How to Fix LG Washer Not Draining or Selector Knob Not Working

If you own an LG washer or washer-dryer combo, you already know how reliable and advanced these machines are. However, even the best appliances can develop problems over time. One of the most common issues users face is when the LG washer is not draining or when the selector knob stops responding.
This can be frustrating, especially if you depend on your washer for daily laundry. The good news is that most of these issues can be fixed easily at home without calling a technician. In this comprehensive guide, I’ll walk you through the step-by-step process of diagnosing and fixing LG washer selector switch and drainage problems, explain what causes them, and provide helpful maintenance tips to prevent future issues.
Whether your washer isn’t draining properly, or the selector knob doesn’t respond, by the end of this article you’ll know exactly what to do to bring your LG washer back to life.
Understanding the LG Washer Selector Knob and Drainage System
The selector knob on an LG washer allows you to choose different wash cycles such as Normal, Delicate, or Heavy Duty. It’s connected to the main control board through a small electrical switch. When you turn the knob, it sends a signal to the board, telling it which cycle to start.
When the knob stops working, you may notice the following symptoms:
- The washer powers on but doesn’t respond to knob movement.
- LED indicator lights around the dial don’t line up with the selected cycle.
- You hear clicking sounds, but the washer doesn’t start.
Similarly, drainage issues occur when water remains in the drum after the cycle is finished. This may be caused by a clogged drain filter, blocked hose, or faulty drain pump.
Both problems—selector knob failure and drainage malfunction—are related to the electrical and mechanical components inside the washer. Fortunately, you can address both with basic tools and a bit of patience.
“Read Also: LG vs Samsung Washing Machines“
Tools You’ll Need
Before you begin, make sure you have the right tools to safely disassemble your washer and access the selector switch:
- Phillips-head screwdriver
- Flat-head screwdriver
- Contact or electrical cleaner spray
- Safety glasses
- A clean towel or cloth
- Optional: multimeter (to test electrical connections)
- Replacement LED or selector module (if cleaning doesn’t help)
Having these tools ready ensures you can complete the repair efficiently and safely.
Step 1: Unplug the Washer and Prepare the Workspace

The first and most important step before performing any repair is safety. Always unplug your washer from the power outlet. Water and electricity don’t mix, and working with an active appliance could lead to serious injury.
Once unplugged, move the washer slightly away from the wall to give yourself space to access the top and front panels. Keep a towel handy to wipe off any dust or detergent residue while working.
Step 2: Remove the Selector Knob and Front Panel
Depending on your model, the selector knob can either be pulled straight off or requires removing the front cover first. For most LG washer-dryer combinations:
- Start by pulling out the detergent drawer completely. Press the small push button inside to release it fully.
- Use a Phillips screwdriver to remove the screws behind the detergent drawer.
- Next, remove the two screws on the top corners of the washer’s back panel. Slide the top panel back about a quarter of an inch, then lift it up and off.
- With the top removed, you’ll see the control panel screws. Remove them carefully.
- Once the screws are out, gently lift the control panel to release it from its clips.
At this point, you’ll have full access to the area behind the selector knob. Don’t pull the panel too hard because it’s still connected to the main control board by wires.
“Read Also: LG FCV309WNE Washing Machine Review“
Step 3: Access the Control Board and Circuit Assembly
Now that the panel is loose, you’ll see the electronic control module—a small board with modular connectors and LEDs. The selector knob is attached to this board via a switch assembly.
- Disconnect the two modular connectors by gently pressing the release tabs and pulling them out.
- Unscrew the board from the panel using your screwdriver.
- Carefully remove the selector switch circuit board from its housing.
You’ll likely notice some dust, lint, or detergent residue around the components. This can interfere with electrical contacts, leading to poor connectivity or unresponsive controls.
Step 4: Clean the Selector Switch Using Contact Cleaner
This step is crucial and often solves the issue without needing replacement parts.
- Hold the circuit board securely on a clean surface.
- Locate the rotary switch—this is the small component the knob connects to.
- Spray a small amount of contact cleaner directly into the switch opening.
- Turn the switch several times to distribute the cleaner inside. You should feel the clicking become smoother.
Contact cleaner evaporates quickly and removes dirt, oxidation, and residue that can cause the knob to stop working.
For extra maintenance, spray a little contact cleaner into the modular connector ports as well to ensure strong electrical contact when you reconnect them.
“Read Also: LG 2025 Front Load Washing Machine Review“
Step 5: Inspect and Repair LED Lights on the Control Board
If some of the LED indicators around your selector knob are not lighting up, it may be due to burnt-out bulbs or faulty solder joints on the board.
Check each LED closely. If you have experience with soldering:
- Heat the solder joints using a soldering iron to reflow the connection.
- If an LED bulb is damaged, desolder it and replace it with a new one.
Alternatively, if you’re not comfortable soldering, you can buy a replacement board module. They are usually affordable and easy to install.
Step 6: Reassemble the Control Panel and Test the Washer
Once the circuit is clean and inspected:
- Place the board back into its housing and secure it with screws.
- Reconnect the modular connectors you removed earlier.
- Snap the control panel back into place and secure it with screws.
- Reattach the top panel by sliding it forward and tightening the back screws.
- Reinsert the detergent drawer.
- Finally, plug the washer back in.
Turn the selector knob and observe the lights. You should now see the indicator aligning properly with each cycle as you rotate the dial. The clicking should feel firm and responsive.
If the knob still doesn’t respond, the issue might be a damaged control module, which can easily be replaced by following the same disassembly steps and swapping in the new part.
“Read Also: How Washing Machines Work“
Step 7: Fixing the LG Washer Not Draining
Now let’s address the drainage issue, which is another common LG washer problem. If water remains in the drum after a wash cycle, follow these steps:
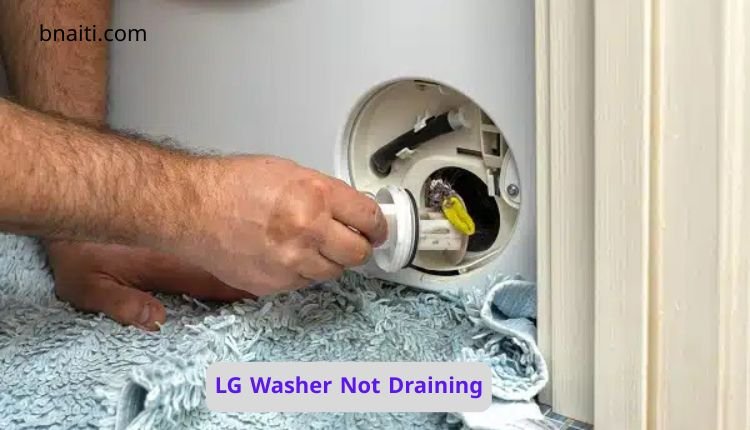
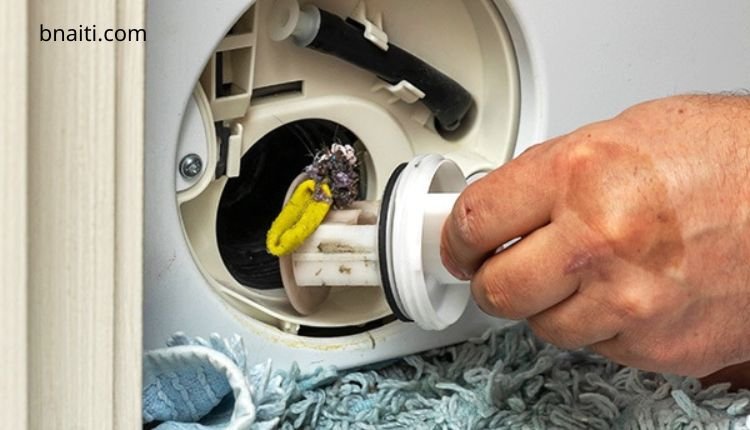
1. Check the Drain Filter
Most LG washers have a small drain filter located at the bottom front corner behind a small panel.
- Open the panel and place a towel or shallow container underneath.
- Twist the filter counterclockwise to remove it.
- Clean out any lint, coins, or debris blocking the filter.
- Rinse it under warm water and reinstall it securely.
2. Inspect the Drain Hose
A kinked or clogged hose can prevent proper drainage.
- Disconnect the drain hose from the back of the washer.
- Blow air through it or run water through it to ensure it’s clear.
- Reattach it and make sure it isn’t bent or pinched behind the machine.
3. Check the Drain Pump
If you still have drainage problems, the drain pump might be faulty. You can access it by removing the lower front panel (secured with screws).
- Disconnect the power.
- Inspect the pump for blockages or broken impellers.
- If the pump makes noise but doesn’t pump water, it likely needs replacement.
Replacing the drain pump is straightforward and can be done with basic tools.

Common Reasons Why LG Washer Selector Switch Fails
Understanding why the selector knob fails helps prevent future issues. Here are the most frequent causes:
- Dust or residue buildup – Detergent vapor and moisture can corrode contacts.
- Loose connectors – Vibration from spinning cycles may loosen electrical plugs.
- Aging components – After years of use, internal switches can wear out.
- Moisture exposure – Excess humidity around the washer can lead to rust or electrical oxidation.
Performing regular cleaning and inspections will keep your washer’s control panel responsive.
Preventive Maintenance Tips
- Clean the control panel monthly: Use a dry microfiber cloth to wipe away dust.
- Avoid overloading the washer: Overloading strains the motor and pump, reducing lifespan.
- Keep the washer dry: After each wash, leave the door open to allow moisture to evaporate.
- Use proper detergents: Excessive suds can clog filters and interfere with sensors.
- Run a maintenance cycle: Once a month, run a hot wash with vinegar or LG’s tub cleaner.
When to Replace the Control Module
If you’ve cleaned the switch, checked all connections, and the knob still doesn’t respond, it’s time to replace the control module. Replacement modules are model-specific but widely available online.
Replacing it is as easy as:
- Removing the old board.
- Installing the new one in its place.
- Reconnecting the modular plugs and knob.
Once replaced, all your LED indicators and cycle selections should function normally again.
Why the LG Washer Might Not Drain After Cleaning
Sometimes, even after cleaning the filter and hose, your washer may still not drain properly. The issue could be related to:
- A blocked internal hose connecting the drum to the pump.
- A failing water level sensor that incorrectly signals the washer is full.
- A defective control board that fails to trigger the pump cycle.
In such cases, a qualified technician can diagnose the issue using an LG service diagnostic tool. However, for most users, cleaning the drain filter and hose solves the problem.
Cost of Repair vs. Replacement
Fixing the selector switch or drainage issue is often far cheaper than replacing the washer.
- Contact cleaner: $8–$12
- Replacement control module: $40–$90
- Drain pump replacement: $35–$75
- Professional repair service: $100–$200
If your LG washer is under five years old, repairing it makes more sense. For older machines with multiple issues, consider upgrading to a new energy-efficient model.
How to Keep Your LG Washer in Top Shape
To ensure long-term performance:
- Wipe the gasket and door seal after every use.
- Keep the detergent drawer open to prevent mold buildup.
- Periodically check the electrical connections inside the control panel for corrosion.
- Avoid splashing water onto the control dial area.
By following these practices, you can extend the lifespan of your washer significantly.
Final Thoughts: Fix LG Washer Not Draining
Fixing an LG washer not draining or a selector knob not working doesn’t have to be complicated. In most cases, simple cleaning and reassembly can restore full functionality.
Using contact cleaner on the selector switch, inspecting the LED control board, and ensuring all connectors are secure can bring your washer back to normal. For drainage issues, cleaning the filter, hose, and pump will often do the trick.
Remember: always unplug the washer before working on it, take your time, and don’t hesitate to replace a faulty part if cleaning doesn’t help. By performing these repairs yourself, you’ll not only save money but also gain confidence in maintaining your home appliances.


